Sidemate
桌伴Sidemate Wiki

5 分钟上手 Sidemate

8 步从安装到第一次对话。默认离线模式,数据不出本机。

第 1 步:下载与安装

当前版本:v0.9.7。两种方式:

  • 方式 A(推荐):从 GitHub Releases 下载 v0.9.7 安装包,一键安装(装到 %LOCALAPPDATA%\Sidemate,无需管理员权限)
  • 方式 B(开发者 / 尝鲜):从 GitCode / GitHub clone 源码运行
    # 国内用户推荐 GitCode,海外用户推荐 GitHub(任选其一):
    git clone https://gitcode.com/slowtooslow/sidemate
    # 或:git clone https://github.com/zwq871482439/sidemate
    cd sidemate
    pip install -r requirements_gen.txt
    python envsetup.py            # 一键环境部署(嵌入式 Python、依赖、llama-server、编译 Launcher)
    python server/server.py       # 启动后端(或编译 launcher 后跑 Sidemate.exe)

系统要求:Windows 10/11 · 离线模式最低 16GB 内存(0.8B 模型)/ 24GB(2B)/ 32GB(4B)· 磁盘需预留 约 10GB(含模型)

第 2 步:首次启动

启动后 Sidemate 会自动创建数据目录(你本机):

%LOCALAPPDATA%\Sidemate\data\

展开后类似 C:\Users\<你>\AppData\Local\Sidemate\data\。所有对话、配置、知识库都存在这里。不联网,不创建任何云端账号。

程序启动后默认在 「对话」Tab(顶部 3 个 Tab:对话 / 知识库 / 设置,没有独立"下载"Tab——下载在「设置」里)。

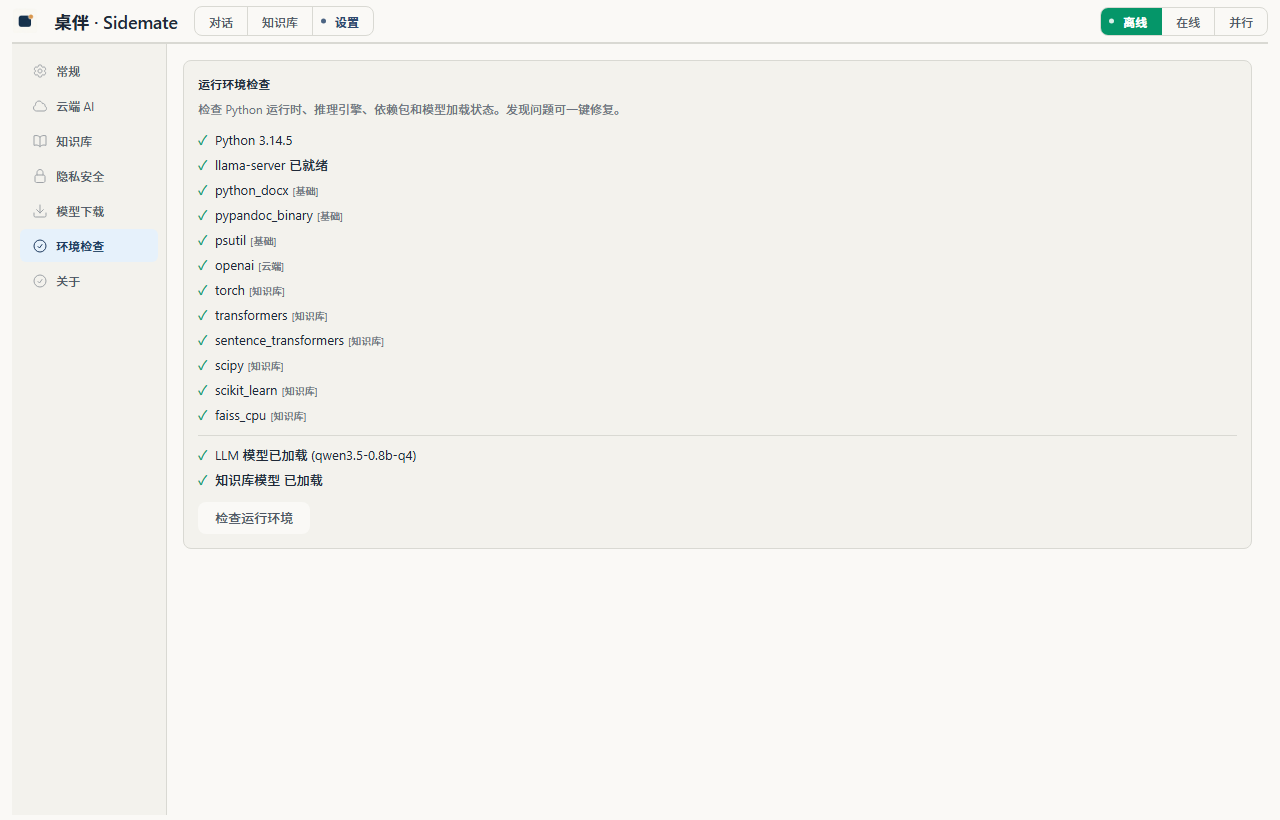
如果检测到依赖缺失(llama-server.exe / 模型权重等),程序会在页面顶部提示依赖缺失,可到「设置 → 环境检查」页查看详情并一键修复。

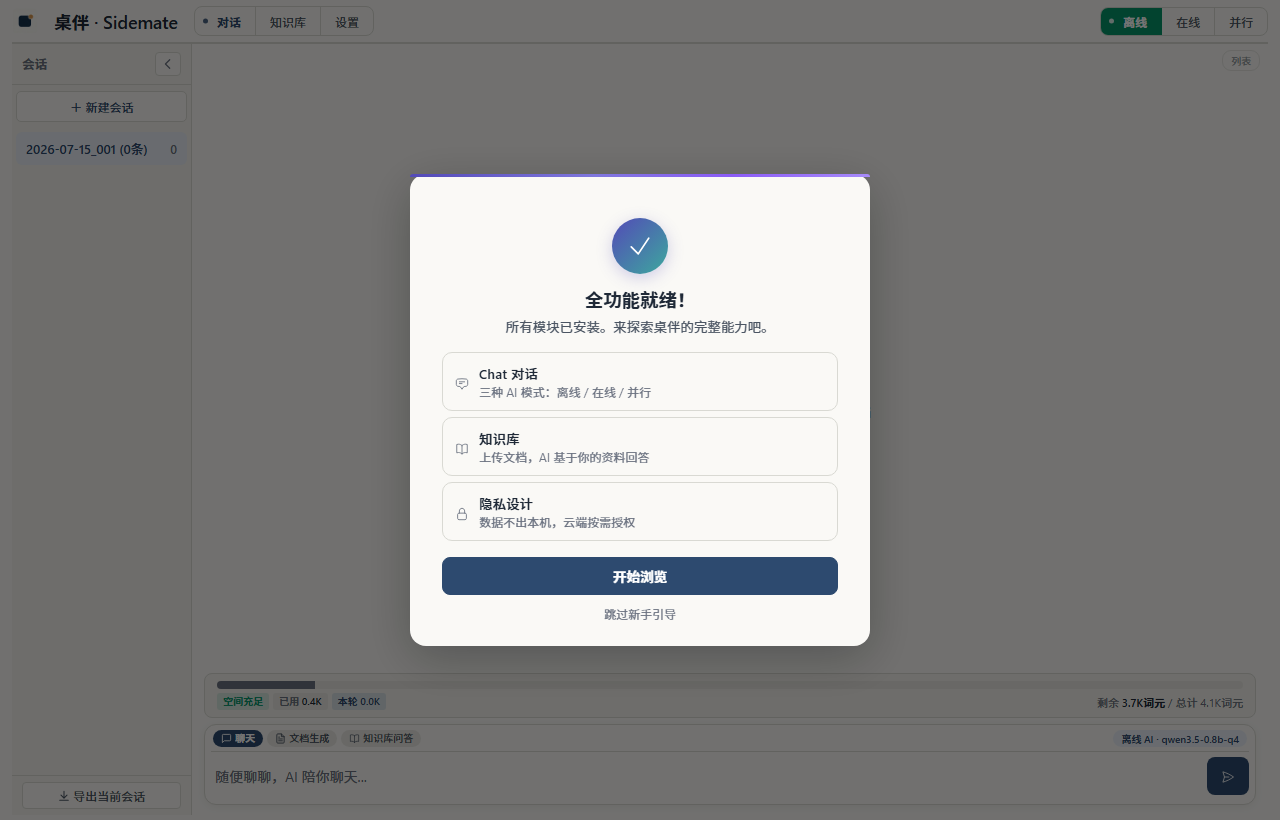
首启时的欢迎卡片
首启时根据已安装模块显示的欢迎卡——这张是 LLM+KB 都装好的"全功能就绪"
设置 → 环境检查 页
「设置 → 环境检查」页——所有依赖都显示已加载

第 3 步:下载模型(一键推荐方案)

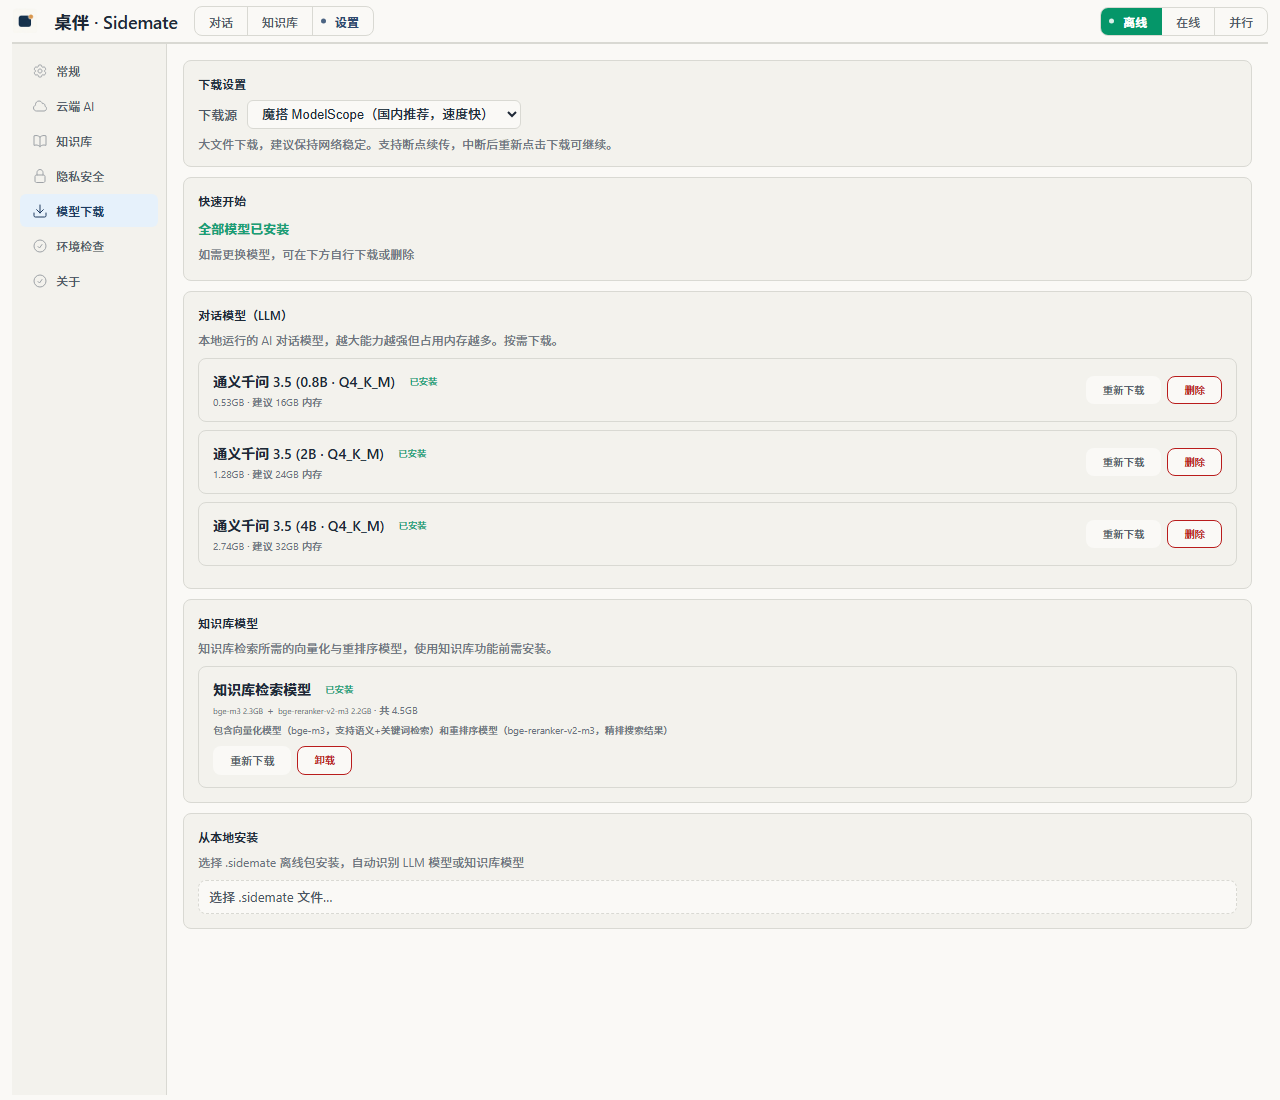
首次启动会弹出欢迎页,点击「本地 AI」卡片直达「设置 → 模型下载」页。点「一键下载推荐方案」:程序按你的内存自动推荐 LLM 档位(16GB→0.8B / 24GB→2B / 32GB→4B),并自动接续下载知识库模型(约 4.5GB)。

下载完成后自动加载并预热模型——无需任何手动操作,回到对话页即可开始聊天。暂时不用知识库也可以只下 LLM(0.5~2.7GB),后续随时在下载页单独补下;也可以在下载页自行挑选档位,或从本地 .sidemate 包安装。

设置 → 模型下载 页
「设置 → 模型下载」页——3 档 LLM(0.8B/2B/4B)+ KB 模型 + 从本地安装

第 4 步:选择默认模式

对话页顶部右侧有三段模式按钮离线 / 在线 / 并行。选「离线」继续:

  • 🔒 离线(默认):所有对话、知识库只在本地,断网也能用
  • 🔌 并行:本地列 + 云端列同时回答,互相对照
  • ☁️ 在线:所有对话发云端服务商(如 OpenAI / DeepSeek / 通义千问)

后续在「设置」里随时切换。

第 5 步:第一次对话测试

在对话页随便发一句话,比如「你好,给我讲个笑话」。

  • 本地模型会一个字一个字冒出来(流式输出)
  • 如果返回内容合理,说明整套链路通了
  • 如果一直转圈不动,看 故障排查

第 6 步(可选):喂一份资料测试 KB

想试试本地知识库?KB 需要向量化模型(bge-m3)和重排序模型(bge-reranker-v2-m3),共 4.5GB。如果你在第 3 步用了「一键下载推荐方案」,它们已经装好;当时跳过的话,在这里单独下载:

  1. 进入「设置 → 模型下载
  2. 在「知识库检索模型」卡片点「下载知识库模型」按钮
  3. 下载完成后进入顶部「知识库」Tab
  4. 拖一份 PDF 或 Word 进去,等后台处理完(看进度条)
  5. 处理完后,点文档开始对话,问"这篇主要讲什么"
  6. 看到 AI 引用了文档内容回答 → KB 通了

全程本地:bge-m3 在你电脑上跑,文档不上传任何服务器(参见 隐私政策 § 4)。

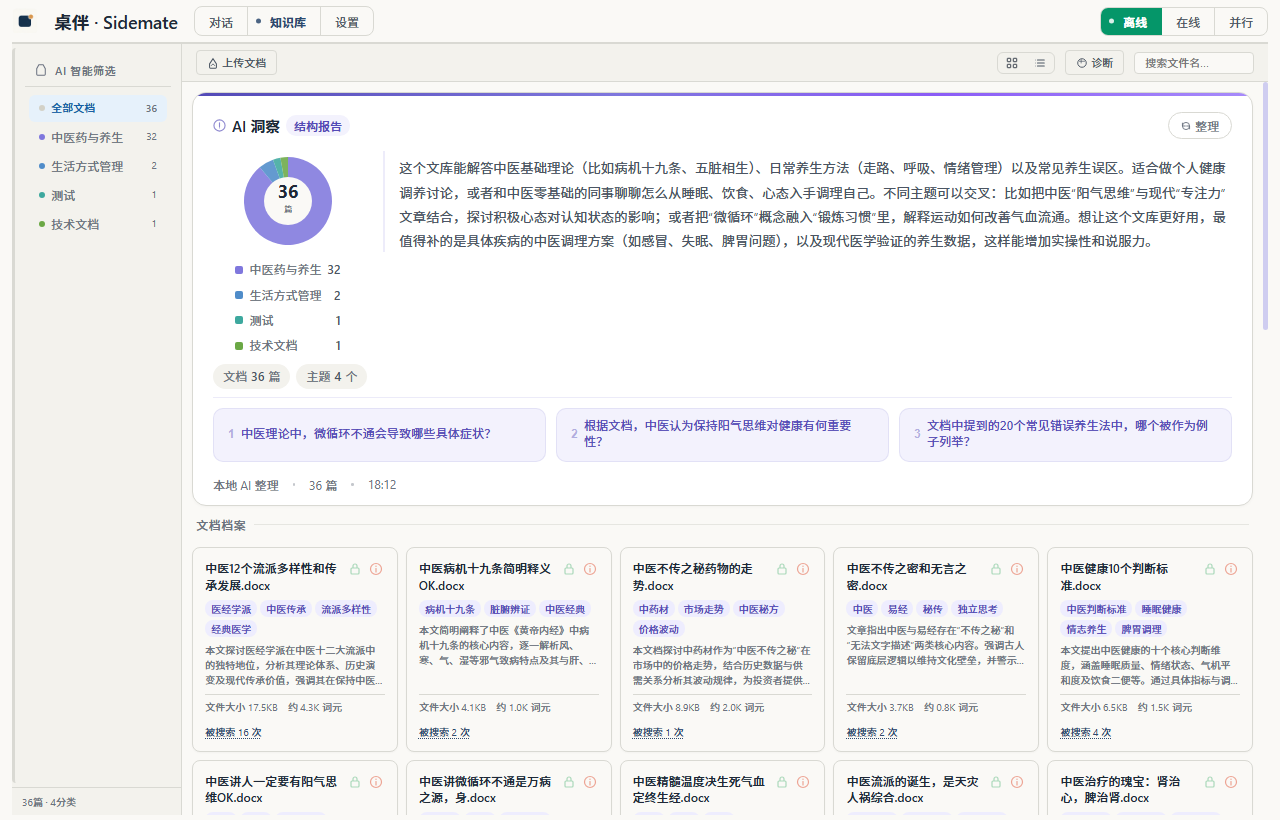
知识库 Tab 截图
「知识库」Tab 截图——文档 36 篇 / 主题 4 个 / 文档档案列表

第 7 步(可选):配云端 API Key

想用「并行」或「在线」模式调用云端模型?

  1. 「设置」页面填入云端 API 地址密钥(OpenAI / DeepSeek / 通义千问 等 OpenAI 兼容协议的服务商都行)
  2. 点「测试连接」验证

API Key 存在 本地%LOCALAPPDATA%\Sidemate\data\settings.json,base64 编码、不外传。

第 8 步:遇到问题怎么办

正常用就行。出问题先看 故障排查 Wiki

  • 模型加载慢 → 检查内存(本地模型最低 16GB)
  • 对话页提示模型未加载 → 前往「设置 → 模型下载」下载模型(完成后自动加载)
  • 对话转圈 → 看 chat 页底部状态指示
  • KB 检索为空 → 文档可能没处理完,或相关性分数太低
  • 在线模式连不上 → 检查 API Key / 网络 / 服务商状态
  • 依赖缺失 → 页面顶部有提示,前往「设置 → 环境检查」修复

还不行?在 GitCode 提 issue | 在 GitHub 提 issue

下一步

Step 1: Download & Install

Current version: v0.9.7. Two options:

  • Option A (recommended): Download the v0.9.7 installer from GitHub Releases — one-click install to %LOCALAPPDATA%\Sidemate, no admin rights needed
  • Option B (devs / early adopters): Clone from GitCode / GitHub and run
    # Domestic users: GitCode recommended; overseas users: GitHub (pick one):
    git clone https://gitcode.com/slowtooslow/sidemate
    # or: git clone https://github.com/zwq871482439/sidemate
    cd sidemate
    pip install -r requirements_gen.txt
    python envsetup.py            # one-click setup (embedded Python, deps, llama-server, launcher build)
    python server/server.py       # start backend (or build Sidemate.exe via the launcher)

Requirements: Windows 10/11 · offline mode requires 16GB RAM minimum (0.8B model) / 24GB (2B) / 32GB (4B) · set aside ~10GB disk (models included)

Step 2: First Launch

Sidemate auto-creates a data directory on your local machine:

%LOCALAPPDATA%\Sidemate\data\

Expanded: C:\Users\<you>\AppData\Local\Sidemate\data\. All conversations, settings, and KB live here. No network calls, no cloud account.

On startup, the app defaults to the Chat tab (the top has 3 tabs: Chat / Knowledge Base / Settings — there is no separate "Download" tab; downloads live inside Settings).

If any dependencies are missing (e.g. llama-server.exe or model weights), a notice appears at the top of the page — go to Settings → Environment Check for details and one-click repair.

All-features-ready card on first launch
"All features ready" card on first launch — click "Start browsing" to enter chat
Settings → Environment Check page
"Settings → Environment Check" page — all dependencies loaded

Step 3: Download Models (One-Click Recommended Bundle)

On first launch, a welcome card appears — click the "Local AI" card to go straight to Settings → Model Download. Click "Download recommended bundle": the app picks an LLM tier based on your RAM (16GB→0.8B / 24GB→2B / 32GB→4B) and then downloads the knowledge base models (~4.5GB) automatically after.

Once downloaded, the model auto-loads and warms up — no manual steps. Go back to the Chat tab and start typing. If you don't need the knowledge base yet, you can download just the LLM (0.5–2.7GB) and add KB models later from the same page; you can also pick a tier manually or install from a local .sidemate package.

Settings → Model Download page
"Settings → Model Download" page — 3 LLM tiers (0.8B/2B/4B) + KB model + Install from local

Step 4: Pick Default Mode

The top-right of the Chat tab has a three-segment mode selector: Offline / Online / Parallel. Pick Offline to start:

  • 🔒 Offline (default): Chats and KB stay local. Works offline.
  • 🔌 Parallel: Local column + cloud column answer side by side.
  • ☁️ Online: Everything sent to cloud provider (e.g. OpenAI / DeepSeek / Qwen).

You can switch any time in Settings.

Step 5: Test Conversation

In the chat page, send anything, e.g. "Tell me a joke".

  • Local model streams token by token
  • If you get a sensible reply, the whole stack works
  • Stuck on loading? See troubleshooting

Step 6 (Optional): Test KB With a Document

KB needs the embedding model (bge-m3) and reranker model (bge-reranker-v2-m3), 4.5GB total. If you used the "recommended bundle" in Step 3, they're already installed; if you skipped them, download separately here:

  1. Go to Settings → Model Download
  2. In the "Knowledge base retrieval model" card click "Download KB model"
  3. Once downloaded, click the top "Knowledge Base" tab
  4. Drag in a PDF or Word file; wait for background processing (watch the progress bar)
  5. Once done, open the doc and ask "What's this about?"
  6. If the answer cites document content → KB works

Fully local: bge-m3 runs on your machine; documents never leave your PC (see Privacy Policy § 4).

Knowledge Base tab screenshot
"Knowledge Base" tab — 36 docs / 4 themes / document archive

Step 7 (Optional): Configure Cloud API Key

To use Parallel or Online mode with a cloud model:

  1. In Settings, fill in the cloud API endpoint and API key (any OpenAI-compatible service: OpenAI / DeepSeek / Qwen / etc.)
  2. Click "Test Connection"

API key stored locally: %LOCALAPPDATA%\Sidemate\data\settings.json, base64-encoded, never transmitted.

Step 8: When Things Break

It usually just works. If not, start at troubleshooting:

  • Model loading slow → check RAM (offline mode requires 16GB minimum)
  • "Model not loaded" prompt on Chat tab → go to Settings → Model Download and download a model (it auto-loads when done)
  • Chat stuck → check status indicator at bottom of chat page
  • KB returns empty → doc still processing, or relevance threshold too low
  • Online mode can't connect → check API key / network / provider status
  • Dependencies missing → notice at top of page; go to Settings → Environment Check to repair

Still stuck? Open a GitCode issue | Open a GitHub issue.

Next Steps